Pages

March 22, 2011

Crockpot Chicken Tacos

These were so simple to make. I put them in the crock pot before I left for work and when I came home it smelled delicious! I love easy meals!! I hate coming home to a dirty kitchen so I try to do the dishes the night before but with meals like these it makes it much easier for us working moms to have something good and healthy and ready for when you get home.


Chicken Soft Tacos

3 chicken breasts
1 package El Paso chicken fajita seasoning
1 can Rotel
1/3 cup water
2 tablespoons olive oil

Sprinkle the fajita seasoning over the bottom of the crock pot. Arrange the three chicken breasts over the seasoning. Pour the can of Rotel over top along with the water and oil. Cook on low for 4 to 6 hours. Shred the chicken with two forks and cook for 30 minutes more. Serve with shredded lettuce, cheese and soft tortillas.

March 17, 2011

Baked French 'Everything' Toast with Blueberries


Yum yum yum!! This was amazing. My mother was stopping by to see Baby J so I wanted to make something fairly easy for us to snack on. I have never been much a french toast person but I recently I have given it a try and it's not so bad. I think my uncle just use to use too much egg and that really turned me off french toast. I found this recipe here. I didn't have any regular bread on hand but I did have a load of Everything Bread from Wal-mart. It is covered in garlic, sesame seeds, and a few other herbs and spices. It made a great sweet dish savory.

Baked Everything French Toast
1/4 c. butter
4 eggs
2/3 c. milk
1/3 c. sugar
1 tsp. cinnamon
8 slices Everything bread or whatever thick bread you want.
Vanilla, optional

handful of blueberries

Melt butter in 10 x 15 pan in oven. Mix sugar and cinnamon. Sprinkle evenly into pan. Mix eggs and milk. Dip bread, soaking well. Toss blueberries over top. Bake at 400 degree oven for 10 to 15 minutes. Let stand 1 minute. Lift out sugar side up on serving platter.
NOTE: Use thick sliced French bread or Texas toast for best results

March 16, 2011

Mozerrella Stuffed Shrimp wrapped in Bacon

Mm mm Bacon.. Everyone has their own recipe for bacon wrapped shrimp. They are super easy and fast to make. I love making these on the weekend as an appetizer for dinner.


12 shrimp
6 slices of bacon cut in half
12 1inch strips of mozzarella
12 tooth picks

Cook 12 halves bacon about half way through. Place the mozzarella inside the shrimp. Wrap with bacon. Insert toothpick to secure bacon and cheese. Cook on stove top in bacon grease about 7 minutes.
Simply yum!!

March 14, 2011

Manacotti Chicken Alfredo

The title alone should intice you. Hubs and I are not big Italian eaters, well he isn't, which in turn has made me not eat it as much as I once did. Most Itailian resturants here are quite gross, like Olive Garden and Zio's uhh no thanks! I would rather make it at home then spending so much money on just okay food and not great waiters. This turned out gorgeous!


Ingredients

  • 3 skinless, boneless chicken breast halves
  • 1/2 cup distilled white vinegar
  • 1 cup olive oil
  • 1 clove crushed garlic
  • 1 (12 ounce) package manicotti pasta
  • 6 tablespoons butter
  • 2 cups heavy whipping cream
  • 1/4 teaspoon ground nutmeg
  • 1 teaspoon ground black pepper
  • 1 1/2 cups grated Parmesan cheese
  • 1 teaspoon salt
  • 1 pint part-skim ricotta cheese
  • 1 egg
  • 1 tablespoon chopped fresh oregano
  • 1 tablespoon chopped fresh marjoram
  • 1 tablespoon chopped fresh basil
  • 1 cup shredded mozzarella cheese

Directions

  1. In a large resealable plastic bag, marinate chicken with vinegar, olive oil, and garlic for at least 30 minutes. Saute in a little olive oil until done. Set aside.
  2. Cook pasta in a large pot of boiling water until al dente. Drain, and set aside.
  3. Meanwhile, melt butter or margarine in a small saucepan over medium-high heat. Add heavy cream, salt, nutmeg, and ground black pepper, and stir until sauce thickens. Reduce heat to low. Add grated Parmesan cheese, and stir until the cheese melts. Set Alfredo sauce aside.
  4. In a large bowl, mix together ricotta cheese, egg, oregano, marjoram, and basil. Mix in cooked chicken.
  5. Stuff cooked manicotti shells with chicken and ricotta mixture. Cover the bottom of a 9x13 inch baking dish with half of the Alfredo sauce. Place stuffed shells on top of sauce. Pour remaining sauce over shells. Top with one cup shredded mozzarella cheese. Cover with aluminum foil.
  6. Bake at 350 degree F (175 degree C) oven for 45 minutes. Let stand 10 minutes before serving.

March 11, 2011

One Word. Ribs.

We both love ribs. I am just now enjoying them again because during pregnancy they were the one thing I turned my nose up at. Over the years I have been part of many cook-offs, more than I can even remember to be honest. I have seen many different teams compete and many "secret" recipes. After watching everyone I have come up with my own. I have debated several times to even share this recipe with you because it's the one of the only recipes that I can say is truly mine. I like sweet ribs with the sauce they are cooked in if done in the oven; but if you do them on the pit make sure you rap the ribs tight with foil paper to save all the juices. I firmly believe that if you must add BBQ sauce to BBQ it's not that good. The meat should sell it self.


Mrs. Jackson's Ribs
1 slab ribs.
1 2 liter Coke
Morton Season All seasoned salt - the amount will depend on the size of your ribs.

1. Marinate the ribs overnight in the coke, approximately halfway through flip the meat. (I usually start put them in the coke about 10p.m. then when I wake up at 8a.m. I flip them and start cooking around 4pm.) 

2. Preheat oven to 375 degrees. Place the ribs on a sheet pan, cover the pan with foil first to avoid the mess. At this point I let the ribs just sit for a few moments and come to rib temperature. Save about 4 tablespoons of the coke, toss the rest.

3.Loosely cover the ribs on both sides with Season All. Make sure to not add too much or it will be very salty you just want to add some flavor. Then in the oven for 45 minutes flip then another 45 minutes.

Check the temperature to make sure they are 165 degrees.

4.At this point I drop the oven to about 330 degrees and pull the ribs out and cover one side in honey. The same way you put the season salt on. You want to zig-zag it across one side of the meat back in the oven for 15 minutes, after that pull them out, flip the rips and add honey to other side and cook for 15 minutes.

5.Pull out of the oven and let set for at least 10 minutes.

Cutting ribs is kind of tricky, you want the most meat on your rib you can get. Just slice them as close to the bone as you can get.  Give 'em a try, they are so simple. Simple makes it so great!! After all, it's the simple things :)

xoxo,
Mrs. J

March 10, 2011

Centerpiece Inspiration


Our walls are pretty bland and we don't have much on them but we are slowly but surely changing that. Remember that green star, well here it is in finished form. It's great but the table still needed something more.

I saw this inspiration on One Pretty Thing and new it would be perfect. So thank you aura joon for these beautiful bottles. You can change the flowers out with any color you could possibly want. I have been saving wine bottles for a few months and Mr. J was starting to get agitated with my so called craft hoarding so i knew this project would be perfect.

I peeled on the labels off the bottles and the let them soak in hot water for about 10 minutes. Then I scrubbed the bottles with a wool sponge to remove all the sticky stuff and any left over paper. It came off very easy. I let the bottle dry overnight. The next morning before work I spray painted them all Almond, the leftover from the star project. When I got home from work I sprayed them all again for a good second coat. I let them dry about 3 more hours then brought the bottles in the house. I had some single stems laying around and just popped em in, I think it came out simply wonderful!


Sorry for the dates on the pictures. I keep thinking I turn it off and it's too late for me to retake the picture. Have a great day! Thanks for stopping by :)


xoxo,
Mrs. J

March 9, 2011

A Lobster & Crab Penne

I usually don't make seafood as an entree because it's just not enough for dinner for Mr. J. I made this a dish for myself, I froze the leftovers in their own package to have at work. I usually never buy lobster for obviously costly reasons but Kroger had a sale two whole cooked lobsters for $5, so I had to get them, also they had a cluster of crab on sale for $3.50. I knew I wanted pasta when I saw the two. I just googled Lobster Crab Penne and What's on the Menu for The Today? popped up first on the list, Love at First Sight! I made a few changes of mine own for my taste but everything was so yummy! I forgot to take a pic of the end product but here is everything measured out. I like to do this pictures then just save the picture and that's my recipe card!! The picture is kind of small but when printed it works perfect for me!


Ingredients:1 cluster of Snow Crab legs
2 Lobster Tail
1 1/2 c. Penne Pasta
2 tbsp. flour
2 tbl butter or margarine (I used butter)
I garlic glove
1 c. milk or heavy cream (I used milk)
2 tbsp. chopped parsley

Salt, Pepper
Grated Parmesan

Directions:

The first step is included if you get fresh however mine was already cooked so I just slightly warmed it back up in the steamer and the pulled all the meat out. 

1.  Boil crab legs and lobster tail in salted water until done;  Approx. 10 min. When done, cool and then remove as much meat from shells as possible.

2.  Boil Penne Pasta in salted water until tender.  (*Tip - put about 1 tbsp of oil in the water to keep the pasta from sticking together.)

3.  In a large skillet, slowly melt butter over medium heat.  Add flour evenly spread throughout the skillet so that the butter soaks up the flour to form a paste.

4.  Gradually add milk/cream and whisk continuously.  Reduce heat as roux begins to thicken.  Add more milk as needed but not so much that roux turns watery.  It should have the consistency of gravy.

5.  Add seasoning to taste and chopped parsley.

6.  Add crab and lobster meat.

7. Combine penne with lobster & crab mixture. Serve with grated parm over top your serving.


Seriously this was amazing!! Hope you had a great weekend!


xoxo,
Mrs. J

March 4, 2011

Worth the Dig

Remember that snow day we had a few weeks back, well that morning I went to Ross to look around for a few things I had been searching for. I used to never go in there because I hated the digging but then I learned the digging was the best part and the deals you find when digging can be fantastic. For instance I got this fabulous key coat hanger for $3.99!  
That's right nothing is even wrong with it!

Also I found this green metal star with some fall decor attached to the front for $0.49!! I knew I would hang the key right away and I did but I wasn't really in love with the green star. So we went to Home Depot over the weekend and I picked up some spray paint. First I did a coat of Krylon Fusion - Espresso then a coat of RustOleum Ultra Cover - Almond. I sanded some of the edges to give that worn look a little. When I went to hang it up I didn't like it. The was the same color as the walls! So I sprayed it again with the espresso and roughed up the edges again. I hung the star over our dinner table and it was gorgeous! I am so in love with it. I can wait to finish the centerpieces for the remainder of that project. More pics coming soon!

PS. The "secret project" is a big p.i.t.a! To remove the paint is actually much more difficult that I thought it would be. I have been sanding paint for weeks now. Any ideas how to make that stuff come off easier?? Let me know in a comment!

PSS. I never started my apron, oh well it's still on my to-do list with about a million other things.

xoxo,
Mrs. J

March 3, 2011

Wreath for Anywhere

I was so inspired by a first birthday invite that I wanted to make something so I could show everyone how cute this little boy is, we'll call him Baby P. Kojo Designs again inspired this project. I recycled the clothespins from my Dr. Seuss baby shower. I traced the outside of a plate onto a thick piece of cardboard from a diaper box. You will need to repeat that step, then glue the pieces together. It is for a baby boy and I found a scrapbook page that was black with white writing, specifically the definitions of what a boy is, I found it perfect for this project! When attaching the paper to the circle be very careful when you tuck it behind. I found that cutting it into strips a little was very helpful it make the paper look very smooth. After that I covered it in Mod Podge (that stuff is amazing!!) I let it dry for about 3 hours, then I hot glued the clothespins with the opening facing out, so they can hold a picture or invite or greeting card! Hot glue ribbon to the back so it can hang and you're done! You can make these with any colors you want to customize for your home!

xoxo,
Rebecca

March 1, 2011

Mardi Gras in Galveston

Hubs and I have been once to Mardi Gras with friends before but we didn't leave til after 5pm and parking was awful and it was the year after Hurricane Ike hit the island. Last year we were honeymooning at this time and I was just over 6 months preggo so Mardi Gras wasn't really in my thoughts. This year was a whole new time. Grandma wanted to some one on one time with Baby J and gave us a great chance to get away. Luckily for us it's only about a 35 minute drive with no traffic. We made it to the seawall just after noon.


We missed the first parade which was fine by us. Then we parked on the seawall and walked on the beach for a little ways. We looked for some shells then we inside a beach tourist shop. After we spent some time just wandering the beach front we drove to the strand, also known as the Historic District, this is where the main festival was happening. It was a little costly at $15 a ticket but we had a great time. Right after we walked in we experienced a mini parade. Then we saw this guy.

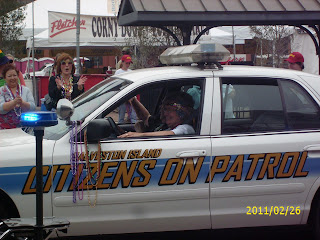
We got some beads tossed our way then we had a beer and some jello shots. We walked around smelling all the great foods and just experiencing all that was being offered. We enjoyed the concert stage where the Honey Brown Band was playing. They did some good covers and for it being still early in the day people were really having a great time. Another mini parade came through and we got more beads, the mayor was driving the police car at the front this parade.

We had a really great time dancing and drinking, we can not wait to go back!

Hopefully next weekend! Have a good day!


xoxo,
Rebecca